Arduino Tutorial 5: Arduino LCD Tutorial
In this Arduino LCD tutorial, you will learn how to display characters (text and numbers) on a 16 x 2 LCD which is very useful in debugging microcontroller projects as well as providing text-based status for your systems.
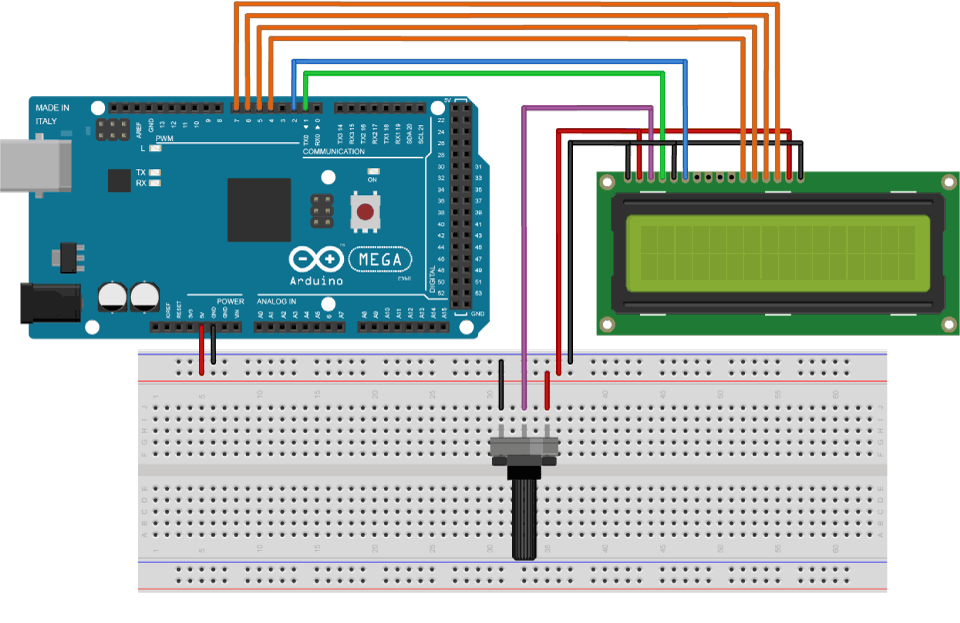
We will use just 6 digital input pins from the Arduino Board. The LCD’s registers from D4 to D7 will be connected to Arduino’s digital pins from 4 to 7. The Enable pin will be connected to pin number 2 and the RS pin will be connected to pin number 1. The R/W pin will be connected to Ground and the Vo pin will be connected to the potentiometer.
Please refer to the diagram below for components wiring.

The code:
/*
* Arduino LCD Tutorial
*
* Crated by Zentronic
*
*/

#include <LiquidCrystal.h> // includes the LiquidCrystal Library
LiquidCrystal lcd(1, 2, 4, 5, 6, 7); // Creates an LC object. Parameters: (rs, enable, d4, d5, d6, d7)

void setup() {
 lcd.begin(16,2); // Initializes the interface to the LCD screen, and specifies the dimensions (width and height) of the display }
}

void loop() {
 lcd.print("Arduino"); // Prints "Arduino" on the LCD
 delay(3000); // 3 seconds delay
 lcd.setCursor(2,1); // Sets the location at which subsequent text written to the LCD will be displayed
 lcd.print("LCD Tutorial");
 delay(3000);
 lcd.clear(); // Clears the display
 lcd.blink(); //Displays the blinking LCD cursor
 delay(4000);
 lcd.setCursor(7,1);
 delay(3000);
 lcd.noBlink(); // Turns off the blinking LCD cursor
 lcd.cursor(); // Displays an underscore (line) at the position to which the next character will be written
 delay(4000);
 lcd.noCursor(); // Hides the LCD cursor
 lcd.clear(); // Clears the LCD screen
}
Feel free to ask any question in the comments section below. Happy coding!