Arduino Lesson 6: Burning Firmware To ESP8266 Module Using Arduino UNO

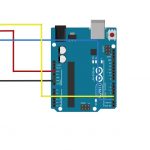
ESP8266 is a 3V device. In order to make if function properly we need to use 3.3V pin of Arduino instead of 5V. If the module being powered with 5V it will be getting hot and could possibly getting damaged permanently. Please refer the diagram below for the wire connection.

After connecting the wires as shown above, upload the code below into Arduino
 #include <SoftwareSerial.h>
 SoftwareSerial esp8266(2,3); // make RX Arduino line is pin 2, make TX Arduino line is pin 3.
                // This means that you need to connect the TX line from the esp to the Arduino's pin 2
                // and the RX line from the esp to the Arduino's pin 3
 void setup()
 {
  Serial.begin(9600);
  esp8266.begin(115200); // your esp's baud rate might be different
 }
 void loop()
 {
  if(esp8266.available()) // check if the esp is sending a message
  {
   while(esp8266.available())
   {
    // The esp has data so display its output to the serial window
    char c = esp8266.read(); // read the next character.
    Serial.write(c);
   }
  }
  if(Serial.available())
  {
   // the following delay is required because otherwise the arduino will read the first letter of the command but not the rest
   // In other words without the delay if you use AT+RST, for example, the Arduino will read the letter A send it, then read the rest and send it
   // but we want to send everything at the same time.
   delay(1000);
   String command="";
   while(Serial.available()) // read the command character by character
   {
     // read one character
    command+=(char)Serial.read();
   }
   esp8266.println(command); // send the read character to the esp8266
  }
 }
Once you have done, run the Arduino Serial Monitor and paste the command given below
- Send AT and press enter. The response should be ‘OK’
- Send AT+RST and press enter. The response should be ‘OK’
- Send AT+CWMODE=3 and press enter. The response should again be ‘OK’
- SEND AT+CWJAP=”SSID”,”PASSWORD” and press enter. You have to change the SSID and PASSWORD with the corresponding wifi network you are going to use. The response should be ‘connected’