Arduino Smart Bin Monitoring Using Blynk

In this tutorial we are going to DIY the project Arduino ESP8266 Smart Bin Monitoring Using Blynk Apps. Documentation files will be provided in this tutorial.


Smart Bin Monitoring is an IOT based project which functions to tell us the level of a particular trash bin through the pre installed Android Apps called Blynk. Blynk apps will show us the current level of the trash bin which will facilitate us in the process where we can monitor the trash bin level across the world via internet connection. It will be very useful and can be installed in the trash cans at public places as well as at home.
This project will use Ultrasonic Sensor to read the trash level. The sensor will be placed at the top of the trash can and will calculate the distance value between the top of the trash can to the garbage level. After obtaining the distance value, the microcontroller Arduino will send the sensor data to the Blynk server via ESP8266 wifi module. If this is your first time using ESP8266 you can refer this tutorial to enable the module connecting to the defined wifi network. Blynk apps will display the value in the form of gauge meter indicating the current garbage level in the trash can. An LED will be used to show an indicator if the trash can is full
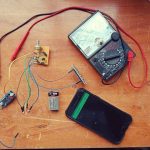
Components Required:
- Arduino Uno (you can use any other)
- ESP8266 Wi-Fi module
- HC-SR04 Ultrasonic sensor
- LED
- Donut Board/Bread Board
- Connecting wires
All of these components can be purchased from Lazada
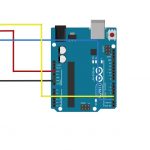
Circuit Diagram:

Please note that ESP8266 is connected to 3.3V instead 5V. ESP8266 runs on 3.3V and if you give it 5V from the Arduino then it won’t work properly and it may get damage
Blynk Apps Setup:
Download the Blynk apps from IOS apps store or Google Playstore. After completing the registration form, please login using your account and select New Project.

Go to project setting and configure the setting as shown below, and press Email all. You will get the authentication code via your email address after a few seconds.

Press widget box and add Gauge into the interface

Configure the gauge setting as below. You are going to need to change the value according to your trash can size. If the trash can height is 17, you have to set the value as shown in the picture below. This value depends on trash can size that you use. The value 3 written in the box indicating that if the trash level is 3 cm from the ultrasonic sensor, means that the trash can is full. You can change the value as well with the value that you think suitable for your trash can.

Project Code:
This project require Blynk library file which can be downloaded from the links provided below
https://github.com/vshymanskyy/BlynkESP8266
Install the library by following this tutorial
After installing the library, you have to upload the code for this project. Please note that you need to change the WIFI ssid and WIFI password and paste the authentication code that has been sent to your email before uploading the code. To purchase the code you may contact us through www.wasap.my/60172565691 or email us at zentronic.enterprise@gmail.com